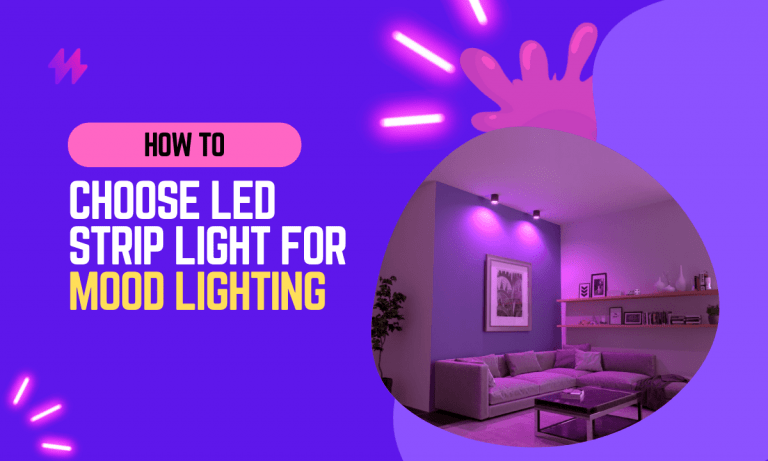
Can You Cut the LED Light Strip? Here’s What You Should Consider
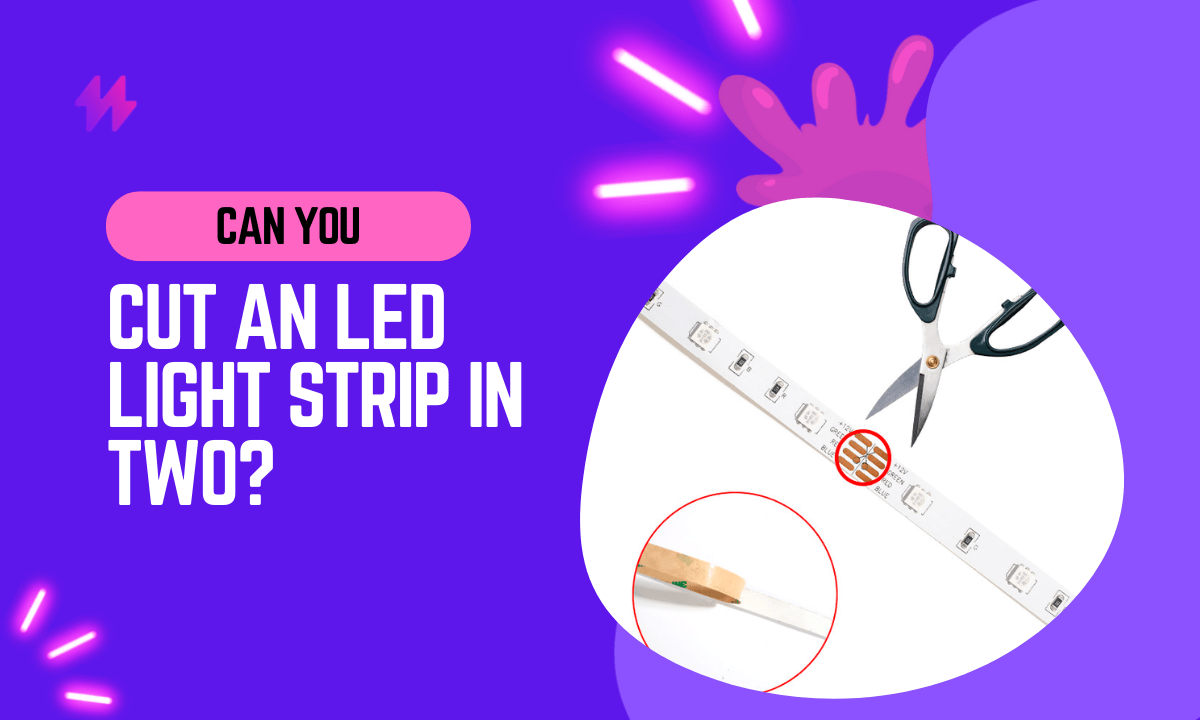
LED light strips have become increasingly popular for their versatility and ease of use in lighting projects. However, not every LED light strip will be the perfect length for your task lighting project, which begs the question: can you cut LED strip lights? The answer is yes, but there are some important factors to consider before you take the scissors to your LED light strip.
In this article, we’ll explore what you need to know about cutting LED light strips and provide tips and guidelines to ensure that you do it safely and effectively.
So whether you’re looking to install led light strips to customize your lighting for your home or business, or you simply need to shorten an LED light strip to fit a particular space, this article will help you understand the basics to cut LED strip lights and how to get the job done right.
When it comes to enhancing your space with illumination, LED light strips are a popular lighting choice due to their customizable lighting effects. Remember that for safe cutting, you should only cut them in designated cut points to maintain proper function and avoid damage to the LED strip model.
Can You Cut the LED Light Strip? Here’s What You Should Consider

The short answer is yes, you can indeed cut the line out. Cutting LED strip lights can be a great way to customize your lighting for specific projects, and it can also be a cost-effective solution for ensuring that your LED strip lights fit perfectly into any space.
However, before you take the scissors or knife to your LED light strip, it’s important to understand the factors you need to consider before cutting. These include the length and width of the LED light strip, the type of LED light strip, the cut points and intervals, and the power supply requirements. Failure to consider these factors can result in damaging the LED light strip, rendering it useless.
It’s important to approach the question of “can you cut the led light strip? here’s what you should consider” with caution and knowledge. To ensure successful customization, select LED strips with visible cut lines for a safe cutting experience, and remember to use a strip-cutting tool for a careful cut at designated spaces.
Where to Cut LED Strip Light for Optimal Results
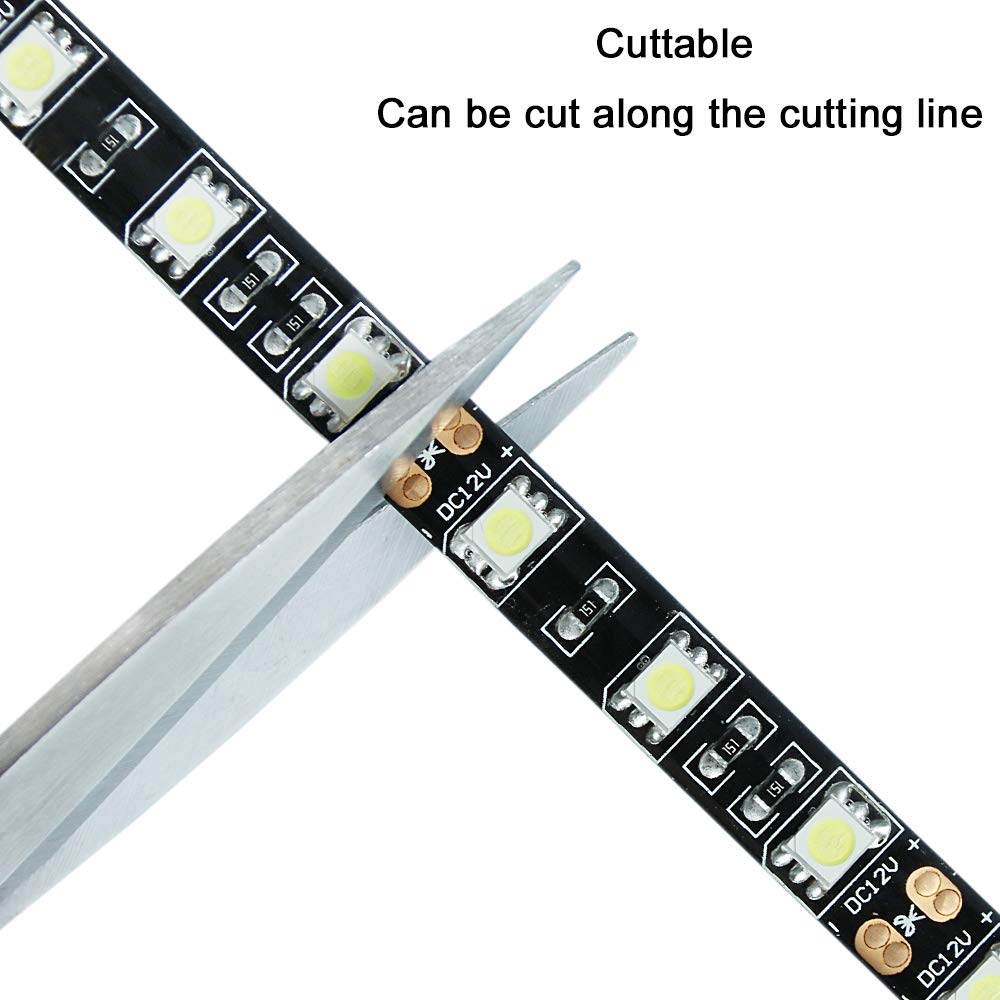
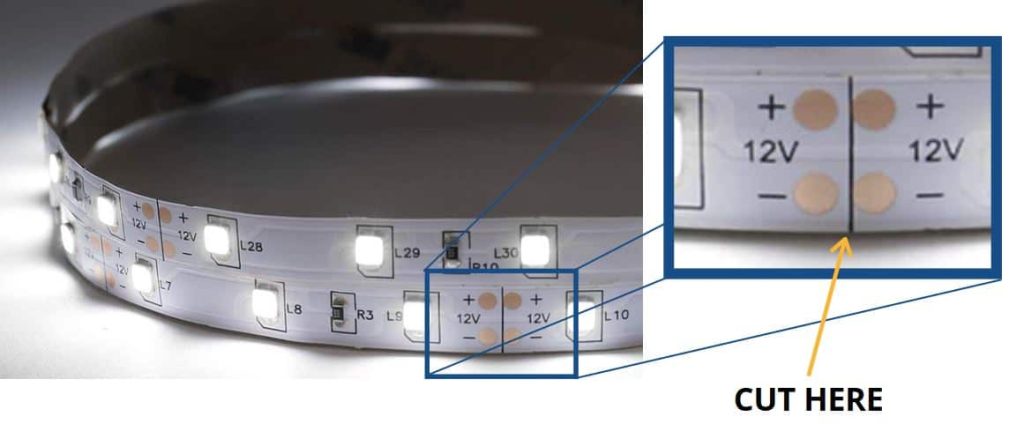
The location or connection point where you can safely cut an LED strip will depend on the specific type of LED strip you are using. Generally, most LED strips have designated cutting lines (copper markings) along the length of the strip where they can be cut without damaging the circuitry. These cut points are often indicated by a line or a scissors logo, which shows where you should cut.
If you’re not sure where the cut points are on your LED strip, consult the manufacturer’s instructions or look for markings or cut lines on the strip itself. Cutting the LED strip in the wrong place can damage the circuitry, rendering the strip unusable.
Also read: How to reset LED light strip remote?
When cutting an LED strip, it’s crucial to follow the guidelines for safe cutting areas to avoid damaging your light strip model. By ensuring that you cut only on the designated cut marks, you will maintain proper function and achieve the desired color and brightness, making the most of your accent lighting features.
Safe Techniques for Cutting Strip Lights
Cutting strip lights can be a great way to customize your lighting for specific projects, but it’s important to take safety precautions to prevent any damage or harm.
Cutting strip lights can be a great way to customize your lighting for specific projects, but it’s important to take safety precautions to prevent any damage or harm. When working with LED strips with visible cut lines, remember that you can only cut them in designated spaces to ensure they continue to function properly and provide the uniform illumination you desire. By utilizing strip light connectors, you can easily pair cut segments to create the right lighting choices for your space.
Ultimate Quick Guide to Cutting LED Strip Lights
Here are some points to consider when cutting strip light safely:
When selecting LED light strips for your projects, consider how they will pair with the space, especially if you’re incorporating mirrors or using them for staircase illumination. Using RGBIC strip lights alongside light strip connectors can enhance your interior design by allowing you to customize brightness and color choices according to your preferences, creating a dynamic and visually appealing environment.
- Wear protective gear: Always wear protective eyewear and gloves to protect your eyes and hands from any debris or sharp edges that may result from the cutting process.
- Turn off the power: Make sure that the power source to the strip light is turned off before you start cutting. This will help prevent any electrical shock or damage to the light strip.
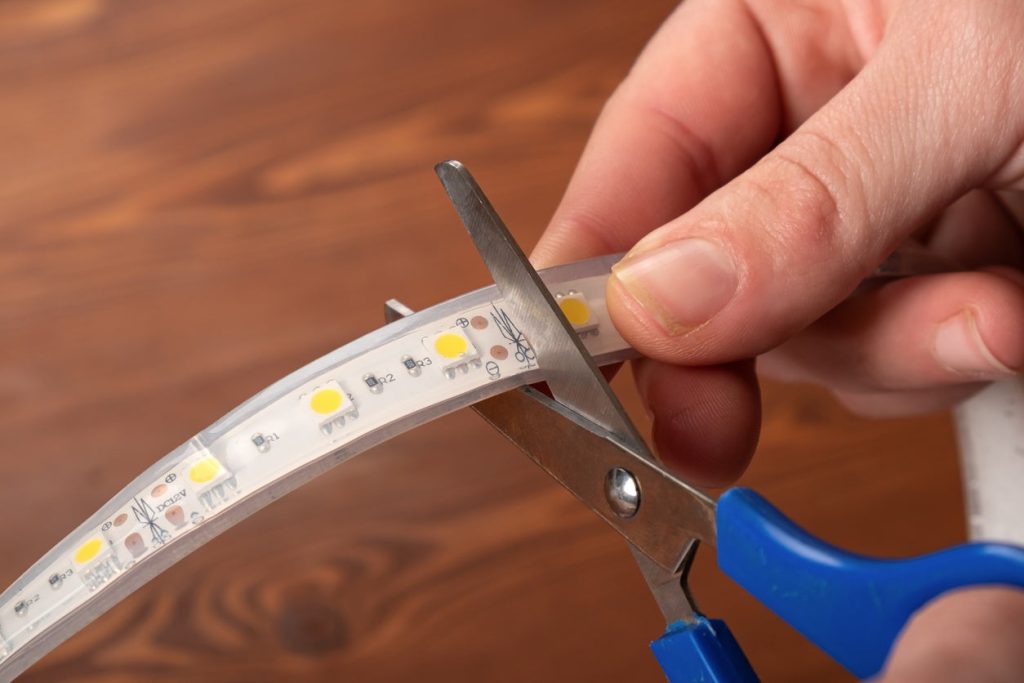
- Measure twice, cut once: Before you start cutting, measure the strip light to ensure that you are cutting it to the right length. This will prevent you from cutting too much off and ruining the strip light.
- Use the right tools: Use specialized tools such as LED strip cutters or wire strippers to ensure a clean and precise cut. These tools are designed to cut the strip light without damaging it, and they can also help prevent accidents or injury.
- Follow the cut points: If your strip light has designated cut points, be sure to cut it only at those points. Cutting the strip light at other points can damage the circuitry and render the strip light unusable.
- Avoid cutting through any wiring: Make sure that you do not cut through any wiring while cutting the strip light. This can cause electrical shock or damage to the strip light.
- Secure the cut end: After you’ve cut the strip light, make sure to apply adhesive tape or clips to secure the cut end in place. This will prevent any accidental damage or disconnection of the strip light. Here we have a video that can help you cut LED light strips.
Post-Cutting Guide for LED Light Strips
After cutting LED light strips, there are several steps you need to take to ensure that the last led strip light can still function properly and is secured in place. Here are some things to do after cutting LED strip lights:
After cutting LED light strips, it’s essential to inspect each section to ensure all edges are clean and properly prepared for connection. By using a dimmer with your regular strip lights, you can control the light level and enhance the overall aesthetic of your space, particularly around mirror borders for a clearer vision of many shades.
How to Install Connectors for Your LED Light Strips
Depending on the type of LED light strip you’re working with, you may need to install connectors to connect the cut ends of the strip back together. There are various types of connectors available, including soldering, clamping, or plug-in connectors. Follow the manufacturer’s instructions for installing the connectors to ensure a proper connection.
Choosing the right connectors is essential for ensuring that the connections between cut LED strips with visible cut lines are both secure and effective. Always double-check that your chosen connectors are compatible with the type of illumination you plan to install, as incompatible strips may hinder the performance of your safe lighting feature.
Wiring the Strip After Cutting LED Light Strips
Once the connectors are in place, you will need to wire the strip to the power supply. This involves connecting the wires from the power supply to the connectors on the LED strip. Make sure the wiring is secure and that the positive and negative connections are properly aligned.
When using 4-pin strip light connectors, ensure they fit snugly to maintain the integrity of your installation. Also, remember that dimming capabilities can significantly enhance the brightness of your single-color strips and add a touch of elegance to your interior strips while keeping a clear vision around areas like a mundane mirror.
How to Secure the Cut End of LED Light Strips
To keep the cut end of the LED strip in place, you can use adhesive tape or clips. This will prevent the strip from accidentally disconnecting or getting damaged.
Adhesive tape or clips can also be beneficial when working with LED strips with visible cut lines are typically safe to cut, as they help secure the cut ends during installation. By ensuring the proper strips are used with the right connectors, you can maximize the brightness of single-color strips and create a stunning color choice around your wall or outdoor strips.
Testing the Strip After Cutting LED Light Strips
Before mounting or installing the LED light strip, test it to ensure that it’s working properly. Connect the strip to the power supply and turn it on to check for any issues or problems.
Must read: 5 Mistakes to Avoid when Cutting LED strip light
When preparing for installation, remember to keep the strip light closest to your desired length to avoid dealing with excess strips later. Utilizing the right connectors and ensuring a clean cut will help in achieving a flawless setup for your led tape lights, enhancing the brightness of single-color strips or creating vibrant multicolor lighting effects.
Will Both Sides Function After Cutting an LED Light Strip?
If you accidentally cut an LED light strip in the middle, both sides will not work independently unless there are separate power supplies for each side. LED light strips require a continuous circuit to work, and if you cut them in the middle, you break the circuit. This means that the cut end of the LED light strip will not work unless you reconnect it to a black wire from a power supply or to a red wire at the other end of the strip.
When you cut an LED light strip, the cut end will only work if it’s reconnected to the other end of the strip or if it’s connected to a separate power supply. Therefore, if you want both sides of the cut LED light strip to work independently, you will need to provide separate power supplies for each side.
Alternatively, you can use a multi-channel LED light strip controller that allows you to have remote control of different sections of the LED light strip independently.
Must read: Can LED Lights Be Left On 24/7 and Why?
To ensure the brightness of your single-color strips, it is advisable to avoid any diagonal cut that might disrupt the circuit powering your LED lights. By properly reconnecting the cut ends to the appropriate power sources, you can maintain the desired color choice and functionality of your hitlights or rope lights, ensuring a seamless lighting experience.
Can You Reconnect Cut LED Strip Lights Together: A Complete Guide
Yes, you can reconnect and cut LED light strips together. However, the process can be different depending on the type of LED light strip and the method used for cutting. Some LED strip lights come with solder pads or connectors that allow you to reconnect the cut ends, while others may require more specialized techniques.
When reconnecting cut LED light strips, it’s important to ensure that the connectors are compatible to maintain the brightness of your single-color strips. By carefully selecting the right connection methods, you can achieve your desired color choice and enhance your overall lighting design effortlessly.
How to Reconnect Cut LED Strips: A Complete Guide
Here are some general steps for reconnecting cut LED strips:
When reconnecting cut LED strips, ensure that you select connectors that match the specifications of your single-color strips to maintain functionality. Choosing the right connectors will help you achieve the desired color choice and ensure the maximum brightness of your entire lighting setup.
Identify the Cut Ends of Your LED Light Strips
Locate the cut ends of the LED lights that you want to reconnect. You may need to remove any insulation or coating on the wires to expose the metal underneath.
After exposing the metal underneath, align the cut ends to the appropriate connectors. This step is crucial to ensure the functionality and brightness of your single-color strips and to assist you in achieving your preferred color choice.
Selecting the Right Reconnection Method for Your LED Light Strips
Depending on the type of LED light strip, you can reconnect the cut ends using soldering, connectors, or other specialized methods. For example, some LED light strips may require heat shrink tubing or wire nuts to reconnect the cut ends.
To achieve optimal brightness for your single-color strips, it’s essential to use connectors that fit securely and match the specifications of your lighting. This will directly influence the color choice you can create throughout your space, ensuring your lighting design is both functional and visually appealing.
Reconnect the Cut Ends of LED Light Strips
If using soldering, place the two cut ends together and solder them together using a soldering iron and solder. If using connectors, clamp them onto the cut ends or plug them in to join the wires. Make sure the connections are secure and the wires are properly aligned.
To ensure the brightness of your single-color strips, it’s crucial that the connections are made securely and precisely. With the right connectors, you’ll be able to create the desired color choice you envision for your space.
Testing the Connection After Cutting LED Light Strips
Once the cut ends are reconnected, test the LED lights to ensure that it is working properly. Connect strips to the power source and turn them on to check for any issues.
Also read: Can You Put LED Light Strips on Wood?
Before finalizing the installation, ensure that the brightness of your single-color strips meets your expectations by testing them thoroughly. By carefully planning your design, you can create a stunning color choice that enhances the ambiance of your space.
What to Do If You Cut Light Strips and They Don’t Work Properly: Troubleshooting Guide
If you accidentally cut the LED strip lights and they don’t work, there are a few steps you can take to troubleshoot the issue:
To begin troubleshooting, first, check if the cut ends of the LED strip lights were properly connected to the power source. If the connections are secure but the brightness of your single-color strips remains low, consider testing each section individually to identify any damaged areas that may be affecting your color choice.
- Check the power source: Make sure the LED lights are connected to a working power source. Test the power source with another device to ensure it’s functioning properly.
- Check the connections: Check the connections at the cut ends of the LED light strip. Make sure the wires are properly connected and there are no loose connections. If you soldered the cut ends, check that the solder joints are solid and there is no cold solder joint.
- Check the polarity: Check the polarity of the strip lights. LED light strips are polarized, which means that the positive and negative wires need to be connected to the correct terminals. Make sure the positive and negative wires are properly aligned.
Understanding Which LED Light Strips You Can’t Cut: Key Considerations
While many LED light strips can be cut, there are some types that you should avoid cutting as they may not function properly or may be difficult to reconnect. Here are some LED light strips that you should not cut:
High voltage LED light strips:
High-voltage LED light strips, such as 110V or 220V LED strip lights, should not be cut as they operate on high-voltage power and can be dangerous to work with. Cutting these LED strip lights can also result in electric shock and damage to the strip.
RGB LED light strips
RGB LED light strips typically have a specific cutting point and should only be cut at that point. Cutting an RGB LED strip light at any other point can result in damage to the strip or incorrect color display. You may also like to read the difference between RGB and RGBIC lights.
Waterproof LED light strips
Waterproof LED light strips are sealed with a protective coating that makes them resistant to water and moisture. Cutting these LED strip lights can damage the coating and expose the strip to water and moisture, which can cause it to malfunction or stop working altogether.
When cutting LED light strips, it’s vital to know which types can be cut safely to avoid complications in installations. High-voltage models and waterproof variants require special attention to maintain their brightness and ensure the integrity of your single-color strips, allowing you to achieve the perfect color choice you envision.
Essential Guidelines: Best Practices for Cutting LED Light Strips
Here are some best practices to follow when cutting LED light strips:
When selecting LED light strips, prioritize those that are designed specifically for safe cutting to help maintain the brightness of your single-color strips. By carefully planning the installation, you can effectively enhance your space with your preferred color choice and achieve a well-coordinated lighting design.
- Before cutting your LED light strips, it’s important to read the manufacturer’s instructions. Some LED light strips have specific cutting instructions that you should follow to avoid damaging the strip.
- Plan where you want to cut your LED light strip to ensure that you get the desired length. Measure the space you want to light up and plan the cuts accordingly. You can use a tape measure or ruler to ensure precise measurements.
- Use the right tools to cut your LED light strips. A sharp pair of scissors or a knife can be used for basic cuts, but for more precise cuts, you may need specialized tools like LED strip cutters. Using the right tool will result in clean cuts and avoid damaging the strip.
Effective Solutions for Troubleshooting Cut LED Light Strips
Check the connections: Make sure that the cut ends of the LED light strip are properly connected. If the connections are loose or do not have enough copper or are properly insulated, the strip may not work properly.
Check the power supply: Make sure that the power supply to the LED light strip is working properly. Check that it’s plugged in and turned on and that there are no issues with the wiring.
Check for damage: Inspect the LED light strip for any damage that may have occurred during the cutting process. If one circuit of the strip is damaged, it may not function properly.
Reset the controller: If the controller isn’t working properly, try resetting it. This can often fix issues with the controller and get the LED light strip working again.
Ensuring that your LED light strips are connected correctly is essential for achieving optimal performance and maintaining the brightness of your single-color strips. Furthermore, by meticulously inspecting for any damage after cutting, you can ensure your color choice aligns with the vision you have for your space.
Conclusion: Key Takeaways on LED Light Strips
In conclusion, cutting LED light strips is a practical option that can significantly enhance the customization of lighting projects to fit specific dimensions and designs. However, this process requires careful consideration to ensure that the functionality of the LED strip is not compromised. Before making any cuts, it is crucial to identify the designated cutting points along the strip, which are typically marked by lines and copper dots. Cutting at these points ensures that each segment of the strip remains operable and prevents damage to the electrical circuits within. Additionally, understanding the voltage and type of LED strip you are working with is essential, as this will influence how you reconnect the sections and whether you will need additional accessories such as connectors or extra soldering.
Furthermore, after cutting LED strips, it is equally important to consider the implications for power distribution and the overall brightness of the LEDs. Shortening a strip can alter the voltage load and potentially increase the current, which in some cases might lead to brighter but shorter-lived LEDs. To address these changes, it may be necessary to adjust the power supply or use a voltage regulator. Ensuring that all connections are secure and properly insulated after making modifications is vital for safety and the longevity of the LED strip. By taking these factors into account, you can successfully customize your LED lighting setup to create a tailored appearance that meets specific aesthetic and functional requirements without sacrificing the durability and efficiency of the LED technology.