How to Connect Multiple LED Lights To One Power Source
In today’s world, LED lights have become increasingly popular due to their energy efficiency, long lifespan, and versatility in various applications. Whether you’re decorating your home, setting up a lighting display, or working on a DIY project, connecting multiple LED lights to one power source can be a practical and convenient solution.
The purpose of this article is to provide you with a comprehensive guide on how to connect multiple LED lights to one power source.
What are the Benefits of Connecting Two LED strips to one power source?
Before we dive into the details, let’s briefly touch upon the importance of connecting multiple LED strip lights to a single power source.
- Simplicity and Convenience: By using a single power source, you eliminate the need for multiple power outlets or adapters. This simplifies the setup process and reduces cable clutter, making it easier to install and manage your LED strips.
- Cost-Effectiveness: Using one power source instead of multiple ones can save you money. You won’t need to purchase additional power adapters or cords, reducing your overall expenses.
- Synchronization: Connecting LED strips to a single power source allows for synchronized lighting effects. Both strips will receive power simultaneously, resulting in consistent color, brightness, and patterns across the entire installation. This synchronization creates a visually appealing and cohesive lighting display.
- Uniformity of Light: When powered from the same source, LED strips tend to have consistent performance characteristics. This means that the brightness, color temperature, and color accuracy will be similar across the connected strips, ensuring a uniform and balanced lighting experience.
- Scalability: Using one power source allows for easy scalability. You can connect multiple LED strips in parallel, expanding your lighting setup without the need for additional power sources. This flexibility enables you to customize your lighting design according to your needs and easily add or remove LED strips as desired.
- Energy Efficiency: LED strips are known for their energy-efficient operation. By connecting multiple strips to one power source, you can maximize the energy efficiency of your lighting system. It ensures that the power supply is utilized optimally, minimizing energy wastage and reducing electricity consumption.
- Ease of Control: When connected to a single power source, controlling and managing the LED strips becomes more straightforward. Whether you’re using a remote control, a wall switch, or a smart home automation system, you only need to operate one power source to control all the connected LED strips simultaneously.
Also read: How to Reset LED strip lights in 6 Steps
Calculating Power Requirements for Multiple LED Lights
Determining the total wattage needed
When connecting multiple LED lights to one power source, it’s crucial to calculate the total power requirement to ensure that the power source can handle the load. To determine the total wattage needed, follow these steps:
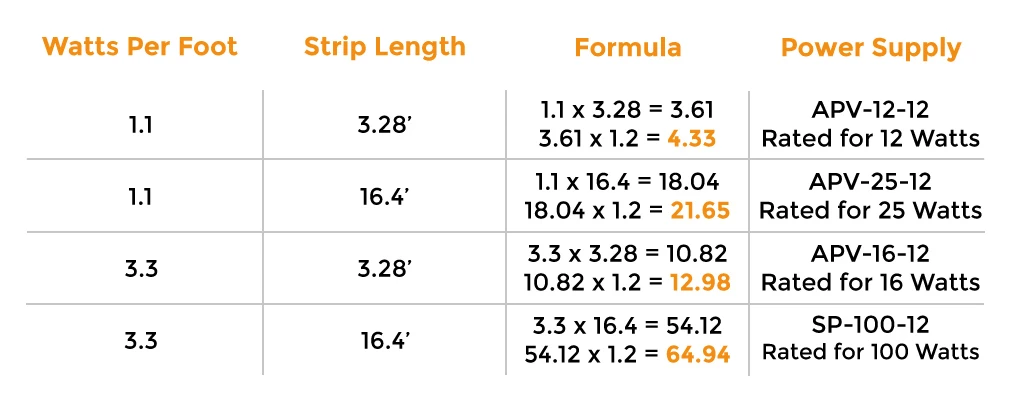
Identify the wattage rating: Each LED light strip or bulb typically has a wattage rating specified by the manufacturer. This rating indicates the power consumed by the LED light. Refer to the product specifications or packaging to find the wattage rating for each LED light.
Sum up the individual wattages: Add up the wattage ratings of all the LED lights you plan to connect. For example, if you have LED light strips with ratings of 6 watts, 8 watts, and 10 watts, the total wattage would be 6 + 8 + 10 = 24 watts.
You may also like to check Lumen to Watt Calculator to identify Wattage needed for your connection.
Calculate the load capacity of the power source
Once you have the total wattage requirement, it’s essential to ensure that your chosen power source can handle the load. The power source should have a higher wattage capacity than the total wattage of the LED strip lights to prevent overloading and potential damage. Here are a few factors to consider:
Check the power source rating: Look for the wattage rating of the power source or power supply unit (PSU). This rating indicates the maximum amount of power it can deliver. Make sure the power source has a wattage capacity higher than the total wattage requirement of your LED lights.
Consider safety margins: It’s advisable to leave a safety margin when selecting the power source. This additional capacity ensures that the power source operates within its limits and remains stable. A safety margin of 10-20% above the total wattage requirement is generally recommended.
Distributing power evenly among the LED lights
To prevent overloading individual LED lights and maintain balanced performance across the entire setup, it’s important to distribute the power evenly. Follow these guidelines:
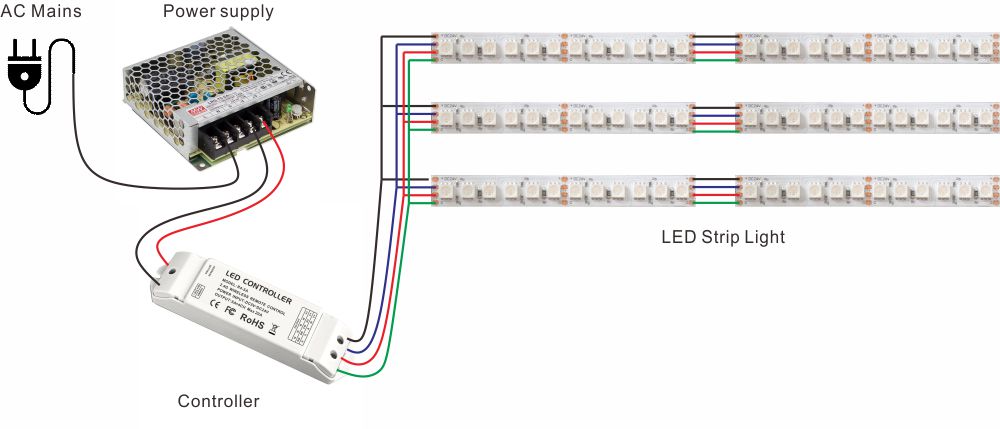
Parallel connection: If you’re connecting LED light strips in parallel, each strip will receive the same voltage but will draw its own current. This means the wattage is divided among the strips evenly. Ensure that the power source can handle the total combined current drawn by all the LED strips.
Series connection: When connecting LED lights in series, the voltage adds up across the connected lights, but the current remains the same. Ensure that the total voltage required by the series connection does not exceed the voltage rating of the power source.
Remember to consult the manufacturer’s specifications for each LED light and the power source to ensure compatibility and proper distribution of power.
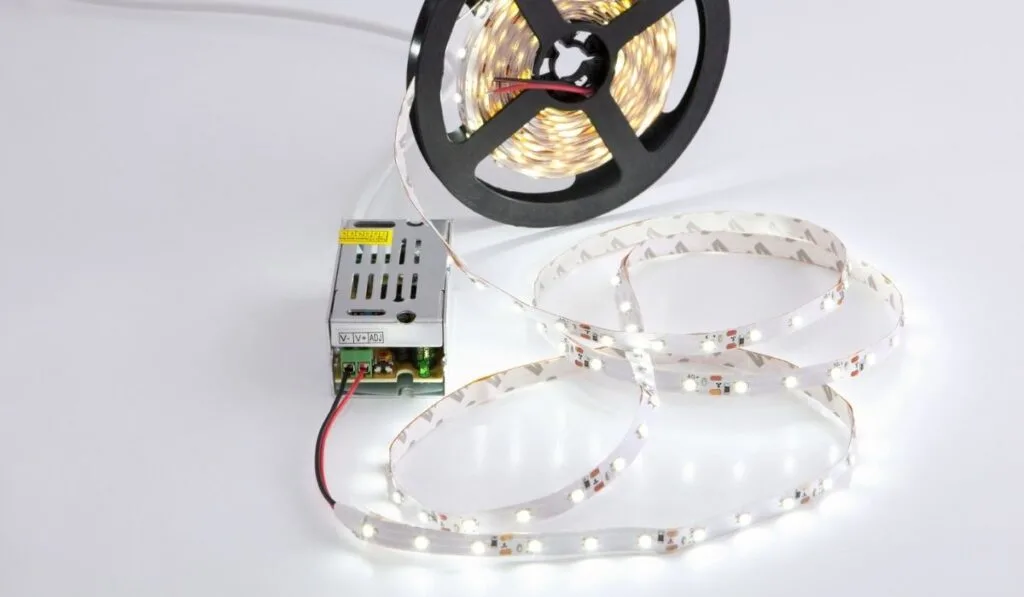
Components and Tools for Connecting LED Lights
To connect multiple LED lights to one power source, you’ll need the following components:
LED lights: Determine the number of LED light strips or LED bulbs you want to connect. Ensure they are compatible with each other and have the same voltage requirements for parallel connections or cumulative voltage requirements for series connections.
Power source: Choose a suitable power source based on the total wattage requirement of your LED lights. This could be a power supply unit (PSU), a transformer, or an AC/DC adapter. Ensure it provides the required voltage and has a wattage capacity higher than the total wattage of the LED lights.
Connectors: Depending on the type of LED lights and wiring setup, you may need connectors to join the LED strips or bulbs together. Common connector types include solderless connectors, screw terminals, or wire nuts. Choose connectors that match the wiring method and size of your LED lights.
Wiring: Select appropriate wires to connect the LED lights to the power source and interconnect the LED lights if necessary. Use wires with a sufficient gauge to handle the current and ensure low resistance. Consider using color-coded wires for easy identification and organization.
Resistors (if needed): In some cases, you may require resistors to regulate the current and voltage supplied to the LED lights. This is particularly important if the LED lights have different voltage requirements or if you’re using a higher-voltage power source. Refer to the LED light specifications or consult an electronics guide to determine if resistors are necessary.
Recommended tools for the wiring process
- Wire cutters and strippers
- Soldering iron and solder (if applicable)
- Screwdrivers
- Multimeter
- Heat shrink tubing (optional)
- Electrical tape
Step-by-Step Guide to Connecting Multiple LED Lights
There are two ways to connect multiple LED lights to one power source. One is by making a parallel connection and another is a series connection.
Wiring the LED lights in parallel
- Plan the wiring layout: Decide on the placement of the LED lights and how you want to connect them. Parallel wiring is commonly used when connecting multiple LED lights to a single power source.
- Cut the wires: Measure and cut the appropriate lengths of wire to connect each LED light to the power source. Leave some extra length for flexibility and ease of connection.
- Strip the wire ends: Use wire strippers to remove a small portion of insulation from the wire ends, exposing the conductive copper.
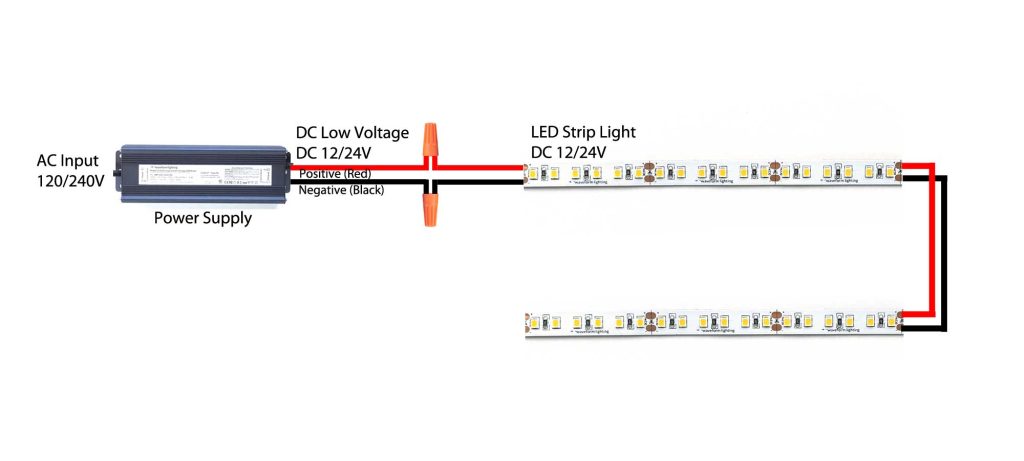
- Connect the wires to the LED lights: For each LED light, connect one wire to the positive terminal (+) and another wire to the negative terminal (-) of the LED light. Follow the manufacturer’s instructions for proper connection methods, which may include soldering, using connectors, or crimping.
- Connect the wires to the power source: Connect the positive wires from all the LED lights to the positive terminal of the power source. Similarly, connect the negative wires from all the LED lights to the negative terminal of the power source. Again, use appropriate connectors or connection methods as needed.
- Secure the connections: Ensure that all the connections are secure and tight. Use soldering, connectors, or other appropriate methods to create reliable connections.
Wiring the LED lights in series
- Plan the wiring layout: If you choose to wire the LED lights in series, determine the order in which they will be connected, considering the voltage requirements and limitations.
- Cut the wires: Measure and cut the appropriate lengths of wire to connect the LED lights in series. Take into account the cumulative voltage required for the series connection.
- Strip the wire ends: Use wire strippers to remove a small portion of insulation from the wire ends, exposing the conductive copper.
- Connect the wires in series: Connect one end of the wire to the positive terminal of the first LED light. Connect the other end of the wire to the negative terminal of the second LED light, and continue this pattern until all the LED lights are connected in series. Follow the manufacturer’s instructions for proper connection methods.
- Connect the wires to the power source: Connect one end of the remaining wire to the positive terminal of the first LED light in the series. Connect the other end of the wire to the positive terminal of the power source. Finally, connect the negative terminal of the power source to the negative terminal of the last LED light in the series.
Also read: How to replace Light Switch without turning off Power
Testing the connection and troubleshooting common issues
- Before powering on the LED lights, carefully inspect all the connections to ensure they are properly secured and there are no loose wires or exposed conductors.
- Turn on the power source and check if all the LED lights illuminate. Observe their brightness, color, and any lighting effects or patterns.
- If any LED lights fail to light up or behave unexpectedly, first check the connections and ensure they are correct and secure. Verify that the power source is providing the correct voltage and has enough capacity to handle the load. Use a multimeter to measure voltage and current at different points in the circuit to identify any issues.
- If adjustments are needed, disconnect the power source and make the necessary changes to the wiring or connections. Re-test the system after each adjustment to ensure proper functionality.
Final Words
In conclusion, connecting multiple LED lights to a single power source efficiently requires a clear understanding of both the electrical requirements of the LED fixtures and the capacity of the power source. This process ensures that all connected lights receive adequate power without overloading the system, which can lead to reduced efficiency or potential damage. When planning your LED setup, calculating the total wattage of all the LED lights to be connected is crucial. This step ensures that the total load does not exceed the output capacity of the power supply, maintaining system safety and longevity. Moreover, considering whether to wire the LEDs in series or parallel is significant; parallel wiring is often recommended as it helps maintain a consistent voltage across each LED, ensuring uniform brightness and performance.
Additionally, using a centralized power source can simplify the installation and maintenance of multiple LED lights, especially in larger or more complex lighting arrangements. It is essential to use appropriate gauge wiring to handle the total amperage load, as well as to ensure all connections are secure and well insulated to prevent any electrical shorts or failures. Properly planning the layout and connectivity of the LED lights not only enhances the visual appeal of the lighting project but also contributes to energy efficiency and safety. By meticulously following these guidelines, one can successfully create a reliable and effective LED lighting system that operates smoothly from a single power source, adding both functionality and style to any space.