How to Connect LED Light Strips in 60 Seconds: Easy Guide
LED light strips are a great way to add some extra lighting to your home. Not only are they stylish and modern, but they can also be quite functional. Plus, they’re relatively affordable, which makes them a popular choice for many homeowners.
One of the most common questions that people have about LED light strips is how to connect them together. This is actually a fairly simple process, but it can vary depending on the type of light strip that you have. In this guide, we will walk you through the process of connecting LED light strips together step by step. We will also provide some tips and tricks that will make the process a little bit easier. Let’s get started!
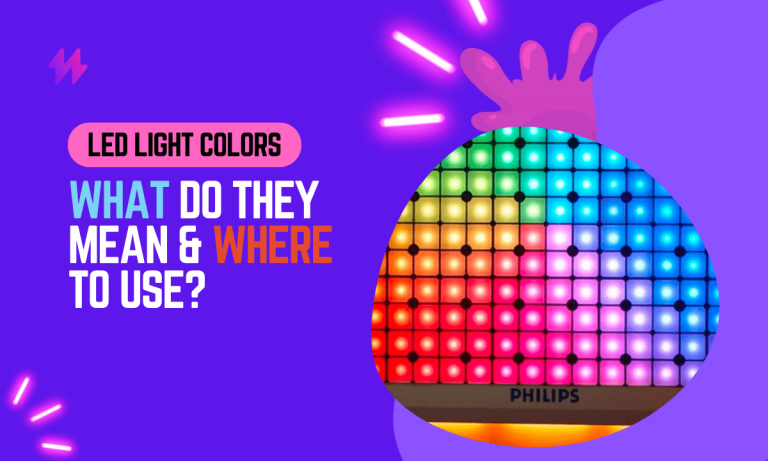
LED light strips come in various styles and options, enabling you to create the perfect ambiance in your space. With a multitude of choices available, from RGB strip lights to energy-efficient lighting solutions, you can easily customize your lighting design to suit any occasion or mood. Connecting LED light strips can be a breeze, especially when utilizing strip light connectors and strip connector options that ensure a clean connection without soldering.
How to Connect LED Light Strips in 60 Seconds: Easy Guide
This is the ultimate guide for you. We will go over everything you need to know in order to connect your light strips like a pro! In addition, we will provide some tips and tricks that will make the process a little bit easier. This way you can place LED light strip behind your TV by connecting multiple LED strips. Let’s get started!
Govee Smart LED Strip Lights
To ensure a seamless experience while setting up your lighting fixture, understanding the importance of electrical connections is vital. Additionally, selecting the right led tape and strip light connectors will significantly enhance the quality of your light design.
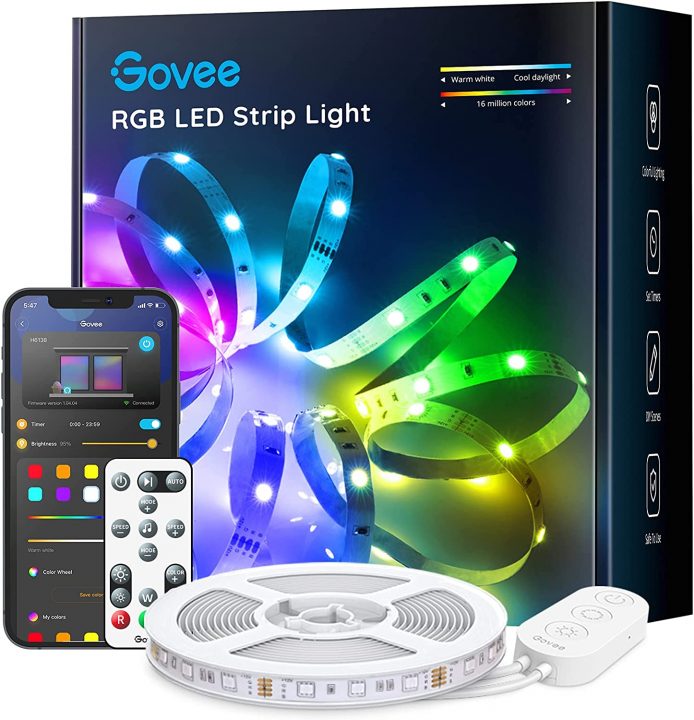
- Wi-Fi LED Light Strip Work with Alexa and Google Assistant
- 16 Million Colors with App Control
- Sync with Music
- Even and bright Light
Essentials for Connecting LED Light Strips Together: What You Need
The first step is to figure out what type of light strip you have. There are two main types of light strips on the market: 12-volt and 24-volt. Most home lighting applications use 12-volt light strips, but some people prefer to use 24-volt light strips for a variety of reasons. If you’re not sure which type of strip you have, simply check the label on the back of the packaging.
Once you know what type of light strip you have, it’s time to gather your supplies. For this project, you will need:
- LED Light Strip (12 or 24 volts)
- Wire strippers
- Wire cutter
- Soldering iron
- Solder
- Heat shrink tubing (optional)
- Electrical tape (optional)
You may also like: How to change LED light color without remote
To ensure optimal functioning of your LED strip lights, it’s crucial to consider the voltage and wattage requirements. Always refer to the wattage tables specific to your project to prevent short circuits and to ensure that your power supplies match the demands of your lighting design.
Comprehensive Step-by-Step Guide: How to Connect LED Light Strips Together
Now that you have all of your supplies, it’s time to get started.
1. The first step is to cut the light strip into the desired length. Most light strips come with marked cut lines every few inches, so simply line up the cutter with one of those lines and make a clean cut.
2. Next, you will need to strip the ends of the wires that are exposed. Use wire strippers to remove about ½ inch of insulation from each end. If you’re using heat shrink tubing, now is the time to slide it over the stripped wires.
3. Once the wires are stripped and/or heat shrink tubing is in place, it’s time to start soldering. Place the two pieces of the light strip that you want to connect side by side and twist the exposed wires together. Then, apply a small amount of solder to the connection and allow it to cool.
4. If you’re using electrical tape, now is the time to wrap it around the connection. This will help to ensure that the connection is secure and will prevent any shorts from occurring.
That’s it! You have now successfully connected two pieces of the LED light strips together. Repeat this process for each additional piece of the light strip that you want to connect.
Also read: How to reset LED light remote controller quickly
To enhance the visual appeal of your space, you can experiment with various led strips lights and the right rgb led specifications to achieve the desired effect. Furthermore, utilizing specific strip light connectors and a proper power adapter will ensure a secure and effective connection, resulting in optimal illumination for your lighting project.
Connecting LED Light Strips Together: Tips and Tricks
- Use wire strippers to remove about ½ inch of insulation from each end of the wires.
- If you’re using heat shrink tubing, slide it over the stripped wires before soldering.
- Place the two pieces of the light strip that you want to connect side by side and twist the exposed wires together.
- Apply a small amount of solder to the connection and allow it to cool.
- If you’re using electrical tape, wrap it around the connection. This will help to ensure that the connection is secure and will prevent any shorts from occurring.
FAQs on Connecting LED Light Strips Together: Essential Tips and Insights
Q: Can I use electrical tape instead of heat shrink tubing?
A: Yes, you can use electrical tape instead of heat-shrink tubing. However, we recommend using heat shrink tubing because it provides a more secure connection.
Q: Do I need to use a soldering iron for this project?
A: No, you do not need to use a soldering iron for this project. You can simply twist the wires together and secure them with electrical tape. However, we recommend using a soldering iron because it will create a more secure connection.
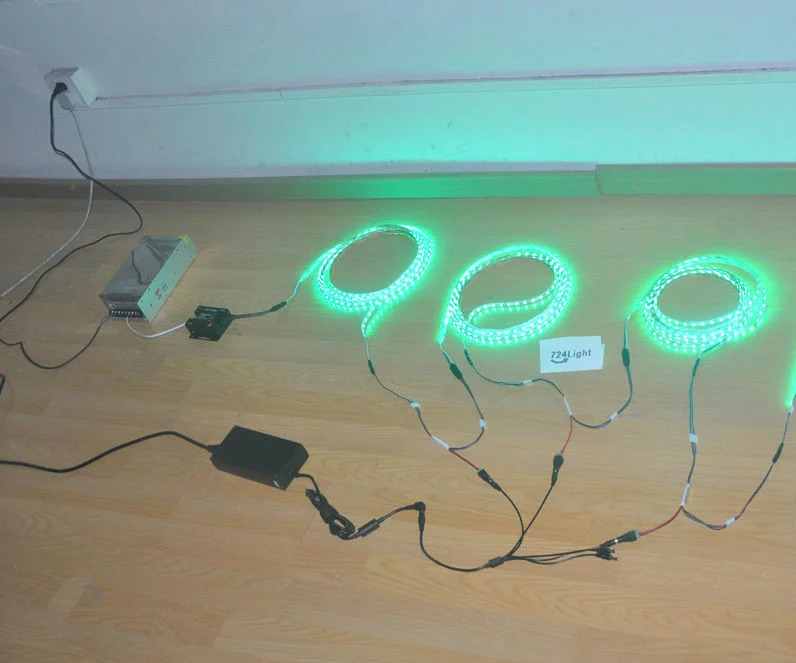
Q: Can I connect multiple light strips together?
A: Yes, you can connect multiple light strips together. Simply repeat the process for each additional strip that you want to connect.
Connecting LED light strips successfully requires attention to specifics like wattages and the correct use of plug connectors. Understanding the varying lengths available in light tapes can help you create stunning light displays tailored to your space’s needs.
Final Insights on Connecting LED Light Strips Together
In conclusion, connecting LED light strips within 60 seconds is an achievable goal that can significantly enhance the efficiency of your lighting projects. This quick and straightforward process is ideal for those looking to quickly add or modify LED lighting without extensive technical know-how. The key to success lies in preparing the materials and workspace beforehand, ensuring that all components such as the LED strips, connectors, and power supply are readily accessible and compatible. Using reliable, snap-on connectors that require no soldering can greatly simplify the process, making it accessible even to novices. These connectors not only save time but also minimize potential errors that can occur with more complex wiring tasks.
Furthermore, it’s important to follow a clear, step-by-step guide that includes checking the polarity of the strips and ensuring a secure connection to avoid common pitfalls such as loose connections or mismatched polarities, which can lead to malfunctioning lights. Emphasizing safety, especially when dealing with electrical components, is crucial. Always ensure that the power source is off while making connections to prevent any accidental shorts or electrical shocks. By following these simple guidelines, you can effectively and safely enhance your home or workspace with LED lighting, adding both aesthetic appeal and functional illumination with minimal effort and time investment. This quick-connect approach not only makes LED strips a versatile choice for various lighting needs but also promotes a DIY-friendly atmosphere for home improvement enthusiasts.
Now that you know how to connect LED light strips together, it’s time to get creative and have some fun with your lighting! If you come up with any cool ideas, be sure to share them with us on our social media pages. We would love to see what kinds of things our readers are creating with LED lights. Happy wiring!
How To Connect LED Light Strips In 60 Seconds: Easy Guide | Essentials for Connecting LED Light Strips
Connecting LED light strips can be a straightforward process with the right tools and understanding of your specific requirements. Essential items include a power cable, LED wire connectors, and strip light connectors for seamless installation. For optimal performance, knowing the strip wattage requirement is crucial; ensure you have accurate wattage estimates to prevent any overload on your power lines. If you’re working with RGB connectors or color-changing lights, it’s important to utilize gapless pin connectors for a smooth transition between sections of your light run. Whether using a handheld remote or direct wiring, these components will help you achieve the desired accent lighting or mood lighting effects in your space. Consider the shape connector and strip light clips to navigate corners effectively while maintaining a clean installation. This easy guide ensures that your LED strip project can be completed in no time, transforming your space with vibrant LEDs display.
How to Connect LED Light Strips in 60 Seconds: Easy Guide | Required Tools for LED Strip Connection
Connecting LED light strips efficiently requires a few essential tools. For a successful setup, have light strip connectors on hand, including solderless connectors and jumper connectors. These components facilitate easy connection at various points, such as a 4-pin connection point or a singular watt output. If you’re working with RGBIC strip lights or color-changing strip lights, connectors like angle connectors and strip light clips will ensure proper alignment and adhesion. For optimal performance, it’s crucial to use adapters that support the required input voltage and max wattage for your project.
To enhance your LED strip installation, consider additional items that improve convenience and functionality. Light tape backing is vital for securing your strips in place, while extra wire becomes useful for longer distances, especially in larger spaces. Any project might also benefit from having ac-dc adapters or solar panels for energy-efficient setups. Many home decorators turn to these tools when setting up ambient lighting or task lighting, ensuring the light output fits their desired atmosphere. For gaps between light portions, gapless pin connections can create a seamless look, making your LED strip project visually appealing and practical.
Types of LED Light Strips and Their Compatibility
LED light strips come in various types, each designed for specific applications and levels of compatibility. For instance, RGB strips provide colorful lighting options perfect for mood and creativity, while single-color options are ideal for simplicity and functionality. Understanding the specifications, such as the number of LEDs per meter and wattage, is crucial. Some strips can reach high wattage levels, making them suitable for long-distance runs, whereas others work best in short distances. These aspects play a significant role in figuring out how to connect LED light strips in 60 seconds: easy guide.
Compatibility also extends to connectors and controllers. Common connectors like angled connectors or strip light connectors ensure a secure fit between segments, which is essential for a permanent connection. Many LED projects require light strip clips to hold the strips in place, while others might benefit from flexible LED tape backing. Knowing about connector pins and how to use them with WiFi-enabled LED controllers allows users to customize their lighting setups easily. With the right tools and understanding, connecting LED light strips becomes a straightforward task, aligning with the essentials outlined in the easy guide.
StepbyStep Instructions for Connecting LED Light Strips
Understanding how to connect LED light strips effectively ensures a smooth installation process. The first step involves gathering necessary tools like a strip light connector for your specific type of LED tapes. Many LEDs, including LED Christmas lights and ribbon lights, require the right positive connectors to function properly, especially in long-distance applications. Knowing how to connect LED light strips in 60 seconds: easy guide aids beginners in avoiding common pitfalls during their strip light project. Keep in mind that certain lights help create the desired ambiance, whether it’s for night lights or a festive atmosphere akin to Christmas lights. Always check the minimum wattage requirements to prevent burning out your LEDs and ensure that your setup can handle the higher wattage RGB options. With a 5-meter long run of LED strip lights, using 4-conductor wire can facilitate easy connections across limited sunlight hours, adding a vibrant color light to any environment.
Preparing Your Workspace for LED Strip Connection
Creating an effective workspace is crucial for a successful LED strip connection project. Select a flat, stable surface with adequate lighting to ensure visibility while working on the installation. Check your supplies to ensure you have everything ready, including your LED strips, strip lights connector, and tools that may be required. Remember, if you’re working with high wattage RGB strips or low voltage strips, keep the connection points accessible for troubleshooting later. You don’t want to be fumbling around for meters of leftover wire when following the How to Connect LED Light Strips in 60 Seconds: Easy Guide.
It is also important to consider the distance you will be running your LED strips. Plan the layout to avoid putting too much strain on the connection points, particularly if you’re using long distance runs. A clean setup will help you stay organized as you connect the lights from ledsupply. Taking time to prepare a clutter-free environment will improve efficiency and reduce chances of error. Following the How to Connect LED Light Strips in 60 Seconds: Easy Guide will be easier with everything in its designated place, ready for your creativity to shine.
Detailed Connection Procedures for Various Strip Types
Understanding the specific connection procedures for different types of LED light strips is crucial for achieving seamless operation. The lighting industry offers various options, each requiring unique steps. For instance, connecting LED strips that feature a blacklight option differs from standard lightbulb designs. To optimize the setup, it’s essential to consider the LED density, measured in leds/m, as this influences both brightness and connection method. Following “How to Connect LED Light Strips in 60 Seconds: Easy Guide” can simplify the process, ensuring quick and efficient results.
Certain LED strips may need soldering or specialized connectors for successful integration. This can take time, especially for users unfamiliar with electrical work. For example, RGB strips often require additional attention due to their multi-colored functionality. By referring back to “How to Connect LED Light Strips in 60 Seconds: Easy Guide,” users can identify the required tools and steps for each strip type. Adapting procedures will lead to a more customized lighting solution tailored to individual preferences.
Troubleshooting Common LED Strip Connection Issues
Dealing with connection issues can be frustrating, especially after following the “How to Connect LED Light Strips in 60 Seconds: Easy Guide.” Identifying the root of the problem is crucial for a quick resolution. Common pitfalls include improper connections, power supply issues, or compatibility mismatches between the LED strip and controller. Diagnosing these problems involves checking the physical connections to ensure they are secure and inspecting the power source for adequate voltage and functionality. Understanding how these factors interplay will aid in effectively applying the strategies from the “How to Connect LED Light Strips in 60 Seconds: Easy Guide” and getting your setup back on track.
Identifying Connection Problems with LED Strips
Connection issues with LED light strips can often stem from a few common errors. One major problem is incorrect polarity; connecting the strips with reversed positive and negative terminals can prevent them from lighting up. Understanding how to connect LED light strips in 60 seconds: Easy guide can help streamline this process and ensure proper alignment. Another issue might be a loose connection between the strip and the power supply or controller, which can lead to flickering or no illumination at all.
Another aspect to consider is the quality of the connections made. Poor soldering or using the wrong connectors may result in inconsistent power delivery. Keeping in mind how to connect LED light strips in 60 seconds: Easy guide can assist in ensuring that each connector is secure and properly fitted. Take a moment to inspect your setup and make any necessary adjustments to help identify and resolve potential issues effectively.
Simple Solutions for LED Light Strip Issues
One common issue with LED light strips is inconsistent brightness or flickering. This can often be resolved by checking the power supply and ensuring it’s adequate for the length of the strip being used. If you followed the How to Connect LED Light Strips in 60 Seconds: Easy Guide, verify that all connections are secure. Often, loose connections can lead to power drops, causing uneven lighting.
Another frequent problem is strip sections not lighting up at all. This is typically due to damaged segments or faulty connections. Inspect each segment for any visible damage and reconnect any loose ends. Following the detailed steps outlined in the How to Connect LED Light Strips in 60 Seconds: Easy Guide can be beneficial in troubleshooting these issues and ensuring that power flows evenly throughout the entire length of the strip.
Creative Ideas for Using Your LED Light Strips
LED light strips offer a versatile way to enhance your living spaces, bringing creativity and ambiance to your home. Using resources like the “How to Connect LED Light Strips in 60 Seconds: Easy Guide,” you can quickly set up your strips for various applications. Consider lining bookshelves, under cabinets, or along hallways to add depth and warmth. You can create a stunning backdrop for your entertainment area by placing strips behind your TV or around gaming setups. For those looking to make a bold statement, think about integrating LED strips into furniture or architectural features, transforming ordinary items into eye-catching focal points.
Innovative Ways to Decorate with LED Light Strips
LED light strips offer a dynamic way to enhance the aesthetic of any room. Placing them under furniture can create a floating effect that instantly elevates the ambiance. Using the How to Connect LED Light Strips in 60 Seconds: Easy Guide can simplify the installation process, allowing you to effortlessly add color accents to bookshelves or entertainment centers.
Creating a backlight for your television is another popular application. This not only reduces eye strain but also adds an attractive glow that enhances your viewing experience. Following the How to Connect LED Light Strips in 60 Seconds: Easy Guide ensures that your setup is quick and efficient, making it easy to transform your living space into a stylish retreat.
Incorporating LED Light Strips in Home Automation
LED light strips can vastly enhance the functionality and ambiance of a smart home. By integrating them into your home automation system, you can control lighting through voice commands or smartphone apps. This seamless integration allows you to customize mood lighting or create dynamic effects that enhance entertainment experiences. For those wondering how to connect LED light strips in 60 seconds: easy guide, the right setup ensures optimal performance when syncing with other smart devices.
Smart home setups become more engaging with the strategic placement of LED light strips. Use them for accent lighting under cabinets, behind TVs, or along pathways. These strips can be programmed to react to various stimuli, such as music or motion. Understanding how to connect LED light strips in 60 seconds: easy guide will facilitate a quick and effective installation process, allowing you to enjoy the benefits of smart lighting without unnecessary delays.