How to Make LED Light Strips Sticky Again: A Step-by-Step Guide
The adhesion of LED light strips plays a vital role in not only maintaining their aesthetic appeal but also ensuring safety and functionality. Loose LED light strips pose potential hazards, especially when they are mounted overhead or in precarious locations. Additionally, these seemingly harmless strips or bulbs can become a tripping hazard if they lose their grip on staircases or walkways.
But fear not! The good news is that you don’t need to replace your beloved LED light strips just because they have lost their stickiness. With a little DIY know-how and some practical restoration steps, you can renew their adhesion and bring back their shine.
In this step-by-step guide, we will look into the reasons why LED light strips lose their stickiness and provide you with effective solutions on how to make LED light strips sticky again. We’ll cover the importance of understanding the problem and identifying signs of degraded stickiness. By learning how to assess the existing adhesive and choosing the right replacement, you’ll be equipped with the knowledge to tackle this issue like a pro
To ensure a successful restoration of your LED light strips, it’s essential to start with a clean surface, free from dust and debris. Once you’ve prepared the area, you can choose from various adhesive options, such as adhesive tape or hot glue, to reaffirm their sticky spots and maintain vibrant illumination in your space.
Understanding Causes of LED Light Strips Losing Stickiness: How to Make LED Light Strips Sticky Again – A Step by Step Guide
Dust and Dirt Accumulation: How to Make LED Light Strips Sticky Again – A Step by Step Guide
One of the primary culprits behind LED light strips losing their stickiness is the gradual accumulation of dust and dirt on the adhesive surface. Over time, airborne particles settle on the sticky backing, creating a barrier between the adhesive and the mounting surface. This layer of grime weakens the bond and leads to reduced adhesion, causing the LED light strips to lose their grip and sag or fall off.
Regular maintenance is key to avoiding adhesive wearing on your LED light strips, which can significantly impact their performance. To achieve the best results for LED strip restoration, be sure to follow a detailed step-by-step guide that addresses potential issues like dust accumulation and improper mounting surfaces.
Effects of Moisture and Humidity: How to Make LED Light Strips Sticky Again – A Step by Step Guide
LED light strips placed in areas with high humidity levels or exposed to moisture are susceptible to losing their stickiness. Humid conditions can cause the adhesive to soften or become less effective, compromising its ability to adhere to surfaces securely. Moisture can also seep beneath the LED lights, weakening the bond and eventually leading to detachment.
To ensure that your LED light strips maintain their brightness and stay securely attached, it is crucial to select the right adhesive materials suited for your environment. Additionally, using an effective lighting solution such as adhesive clips can enhance your strip light experience by allowing for easy adjustments without compromising the adhesion quality.
Assessing Initial Adhesive Quality: How to Make LED Light Strips Sticky Again, A Step by Step Guide
Sometimes, LED light strips may come with adhesive of inferior quality from the manufacturer. If the initial adhesive used during installation is of poor quality or not suited to the mounting surface, it can fail prematurely. Additionally, certain LED light products might not have strong enough adhesive to support their weight or the environmental conditions they are exposed to, making them more prone to losing stickiness over time.
Must read: 2835 vs 3528 vs 5050: Understanding LED Light Strip
LED light strips may struggle with adhesive quality, leading to issues like inadequate stickiness and uneven lighting. For optimal performance and aesthetic appeal, it’s advisable to explore energy-efficient lighting solutions and consider using double-sided adhesive tape or super glue during light strip restoration.
Identifying Signs of Degraded Stickiness: How to Make LED Light Strips Sticky Again – A Step by Step Guide
To determine whether your LED light strips are losing their stickiness, watch out for the following signs:
To determine whether your LED light strips are losing their stickiness, watch out for the following signs: noticeable gaps between the strips and the surface, or if they begin to peel away from their mounting area. If you find yourself in a “sticky situation,” you may want to refer to “how to make led light strips sticky again: a step by step guide” to restore their adhesion properly.
- Sagging or Drooping: If you notice that your LED lights are no longer clinging tightly to the surface and are starting to sag or droop, it’s a clear indication that the adhesive is losing its effectiveness.
- Partial Detachment: LED light strips that have partially come off from the mounting surface are a red flag for degraded stickiness. Even if they haven’t fallen completely, partial detachment can lead to further issues and potential safety hazards.
- Sliding or Shifting: When you find your LED lights shifting position or sliding slightly when touched, it indicates that the adhesive is no longer providing a secure hold.
- Visible Dirt or Residue: If you notice dirt or residue collecting around the edges of the LED light strips or on the sticky surface itself, it’s a sign that dust and grime are compromising the adhesive.
How to Make LED Light Strips Sticky Again: A Step-by-Step Guide

Before embarking on the restoration journey, it’s crucial to prioritize safety. Here are some essential precautions to observe:
To ensure the longevity and effectiveness of your LED lighting, you should regularly check the adhesive spots to see if they’re holding firm. Additionally, utilizing adhesive tapes or adhesive glue can help you combat any sticky situations that may arise with your LED strip holders, maintaining a smooth attachment to your desired surfaces.
- Power Off the LED Light Strips: Ensure that the LED lights are disconnected from the power source before attempting any restoration work. This minimizes the risk of electric shock and protects both you and the LED light strips during the process.
- Use Personal Protective Equipment (PPE): Depending on the cleaning agents or adhesive you’ll be using, consider wearing gloves and safety goggles to shield your skin and eyes from potential irritants or chemicals.
- Work in a Well-Ventilated Area: If you’ll be using any cleaning agents or adhesives with strong odors, work in a well-ventilated space to avoid inhaling fumes and maintain good air circulation.
- Mind Your Surroundings: Be aware of your surroundings and the placement of the LED light strips you’ll be working on. Ensure you have a secure and stable platform, ladder, or step stool if you need to reach higher areas.
Gather Your Tools and Materials: How to Make LED Light Strips Sticky Again – A Step-by-Step Guide
To streamline the restoration process, gather the necessary tools and materials beforehand. Here’s a checklist to ensure you have everything you need:
When embarking on restoring your LED light strips, ensure that you have gathered all necessary materials, including adhesive connectors and sharp scissors, to enhance your efficiency. This preparation will enable a smoother process, allowing you to focus on achieving your desired lighting effects with the new strips while preventing issues caused by old adhesives.
- Soft Microfiber Cloths
- Mild Cleaning Solution
- Isopropyl Alcohol
- Adhesive Remover (if needed)
- New Adhesive
- Adhesive Applicator (e.g., brush, applicator gun)
- Painter’s Tape
- Screwdriver or Pry Tool
Taking Down the LED Light Strips: How to Make LED Light Strips Sticky Again: A Step-by-Step Guide
Before proceeding with the restoration process, carefully remove the LED light strips from their current positions. If they were attached with screws or clips, use the appropriate tools to detach them from the mounting surface.
As you take down the LED lights, inspect the condition of the existing adhesive. Note any areas with residual adhesive or dirt buildup, as these will need special attention during the cleaning phase. Handle the LED light strips with care to avoid any further damage or detachment during the removal process.
By taking these preparatory steps and ensuring safety measures are in place, you’re now well-prepared to begin the restoration process. The upcoming steps will guide you through the cleaning, adhesive replacement, and reinstallation, ultimately bringing back the stickiness and brilliance of your LED light strips.
Also read: How to Stick LED Strip Lights on the Wall
Implementing the right cleaning strategy is essential for the longevity and performance of your LED light strips. Utilizing a citrus-based cleaner on clean surfaces can effectively remove any residual adhesive fallout while promoting optimal adhesion when installing your fresh strips.
How to Make LED Light Strips Sticky Again: A Step-by-Step Guide on Cleaning the LED Light Strips
There are three methods to clean the LED light strips
When restoring your LED light strips, it’s important to recognize the various cleaning methods available. Using a soft towel or paper towel can effectively eliminate dust and debris, ensuring that your adhesive backing adheres properly for optimal operation in accent lighting setups. Proper maintenance can help prevent excessive glue and adhesive aftermath, making it easier to restore brightness levels in your lighting needs. Following detailed step-by-step instructions is crucial to ensure that your LED strip fits securely and efficiently along your desired surfaces.
A. Gentle Cleaning Methods | How to Make LED Light Strips Sticky Again: A Step by Step Guide
Cleaning LED light strips requires a delicate touch to preserve their integrity and prevent damage. Here are some gentle cleaning methods to ensure your LED light strips remain in pristine condition:
Dry Dusting: Start by dry dusting the LED light strips using a soft microfiber cloth or a dry, clean brush. Gently wipe away any loose dirt, dust, or cobwebs from the surface and corners of the lights. This step helps remove the initial layer of grime before proceeding to deeper cleaning.
Damp Cleaning: For more stubborn dirt or residue, use a mild cleaning solution. Mix a small amount of gentle detergent or soap with water to create a diluted solution. Dampen the microfiber cloth with the solution, ensuring it’s not dripping wet, and gently wipe down the LED light strips. Avoid using excessive water, as moisture can seep into the lights and damage the internal components.
To maintain the effectiveness of your LED light strips, consider utilizing a proper cleaning method that won’t damage the fragile components. Additionally, when you encounter issues with adhesive aftermath, opting for additional adhesive options such as glue dots can ensure a firm attachment, allowing your accent lighting to shine brightly without hindrance.
Effective and Safe Options: Recommended Cleaning Solutions for LED Light Strips
When choosing a cleaning solution for your LED light strips, opt for safe and effective options that won’t harm the lights or adhesive. Here are some recommended cleaning solutions:
Isopropyl Alcohol: Isopropyl alcohol is an excellent option for removing stubborn residues, grease, or sticky substances from the LED lights’ surfaces. Apply a small amount of isopropyl alcohol to a clean cloth and gently rub the affected areas.
Vinegar Solution: A mixture of equal parts water and white vinegar can be used as a natural cleaning solution. Vinegar is effective in cutting through grease and grime while being gentle on the LED lights.
To maintain the effective operation of your LED lighting needs, considering the right cleaning methods can make a significant difference. Using a soft towel or paper towel with the appropriate cleaning solutions can help ensure that your LED components are free from debris, allowing them to shine with a soft glow and maintain their high brightness levels.
C. Drying the LED Light Strips Effectively: Eliminating Residue
After cleaning the LED light strips, it’s essential to dry them effectively to remove any remaining moisture and residue:
Air Drying: To air dry the LED light strips, place them on a clean, dry surface or hang them in a well-ventilated area. Allow them to air dry completely before proceeding to the next steps. Avoid using heat sources like hair dryers or heaters, as excessive heat can damage the LED light strips.
Using Soft Cloths: Pat the LED light strips gently with a soft, dry microfiber cloth to remove excess moisture and ensure a thorough drying process. Be careful not to apply too much pressure, as LED light strips can be fragile.
Ensuring No Residue: Check for any remaining residue from the cleaning solution or adhesive. If any residue persists, repeat the cleaning process or use a specialized adhesive remover to eliminate it completely.
Also read: How to Hang LED Strip Lights on Wall Without Adhesive?
After ensuring that your LED light strips are thoroughly dried, it’s vital to check how well they fit onto the wall surface or any other mounting area. Using adhesive mounting clips can be an excellent way to provide extra support, ensuring that the strips do not fall and continue to emit high-brightness light with minimal interference.
Step-by-Step Guide: How to Apply New Adhesive to LED Light Strips
Once you’ve cleaned and dried your LED light strips, it’s time to apply the new adhesive to restore their stickiness. Follow these step-by-step instructions for a successful adhesive application:
Before applying the new adhesive, ensure the surface is appropriate for the type of adhesive backing you’re using to prevent any peeling or insufficient adhesion. By following detailed step-by-step instructions, you can achieve a secure fit for your LED strip that will not fall off, even in areas exposed to direct sunlight or high activity.
Essential Preparations for LED Light Strip Restoration: Clean and Dry Surfaces
Before applying the new adhesive, ensure that both the mounting surface and the back of the LED light strips are clean and dry. Any residual dirt, dust, or moisture can hinder the effectiveness of the new adhesive.
To effectively restore your LED light strips, using a plastic pry tool can help you gently remove any old adhesive without damaging the strips themselves. Following these easy steps ensures that the adhesive labels are applied correctly, preventing any chances of the LEDs falling off, especially on dark surfaces or freshly painted walls.
Selecting the Appropriate Adhesive for Optimal LED Light Strips Performance
Select an adhesive that is specifically designed for bonding LED light strips to various surfaces. Look for adhesives that are strong, durable, and suitable for the materials of both the LED strip lights and the mounting surface. Double-check that the adhesive is appropriate for the environmental conditions the LED strip lights will be exposed to, such as humidity and temperature fluctuations.
When selecting an adhesive for your LED light strips, consider materials such as silicone glue that provide long-lasting bonding, especially on surface types like white surfaces or bendable boards. Ensuring that your chosen adhesive is resistant to humidity and temperature shifts will help you prevent excessive glue failure, particularly when mounting strips in high-activity areas or near light windows where they may encounter different light types.
Applying the Adhesive: Essential Steps for Restoring LED Light Strip Stickiness
Depending on the type of light strip and adhesive you have, follow these techniques for even distribution:
When working with mirrors or wall washer lights, ensure that your LED strip fits perfectly along the edges to enhance the overall illumination effect. This attention to detail can significantly contribute to the aesthetic of your space, particularly when using low profile lights in combination with traditional incandescent bulbs or task lighting.
- Adhesive Strips or Pads: If your adhesive comes in pre-cut strips or pads, carefully peel off the backing and apply them evenly along the back of the LED strip lights. Ensure that the adhesive covers the entire back surface and reaches the edges.
- Liquid Adhesive: For liquid adhesives, use an applicator brush or applicator gun to apply a thin, even layer of adhesive to the back of the LED strip lights. Avoid applying too much adhesive, as excess can ooze out when you press the lights onto the mounting surface.
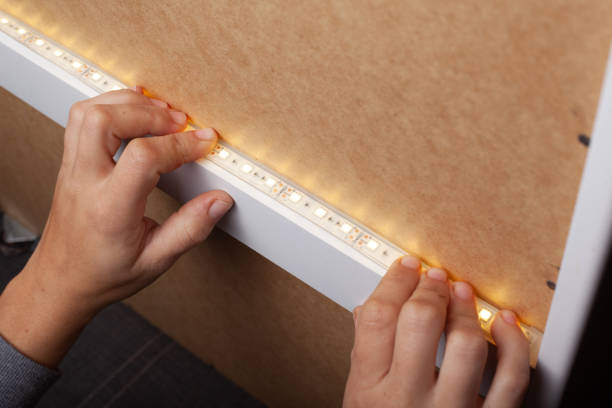
Positioning LED Light Strips Correctly: Aligning and Pressing for Optimal Stickiness
Carefully align the LED strip lights to their desired positions on the mounting surface. Use painter’s tape to mark the correct placement beforehand if needed. Once you are satisfied with the alignment, firmly press the LED light strips onto the surface to ensure good contact with the adhesive.
When working with LED strip lights, it’s essential to handle the wires delicately to avoid any damage during the installation. If your LED strip lights begin to fall due to inadequate adhesion, you may need to consider additional support from adhesive tapes or consult the strip light manufacturers for alternative adhesive solutions that may work better with your wall paint.
Curing Time: Essential Waiting Period for Restoring LED Light Strip Stickiness
After attaching the LED light strips to the mounting surface, allow the adhesive to cure for the recommended duration according to the adhesive manufacturer’s instructions. Avoid turning on the lights or applying any pressure to the LED strip lights during this curing period.
You may also like: How to Remove LED Strip Light Adhesive?
After ensuring the adhesive has cured properly, double-check the attachment to avoid the LED strip fall due to inadequate bonding. If any light strips cool down during usage, inspect for loose connections or areas needing adhesive further to maintain consistent illumination.
Conclusion: Key Takeaways on Restoring LED Light Strips Stickiness
In conclusion, restoring the adhesiveness of LED light strips is essential for maintaining the clean and secure installation of your lighting setup. Over time, the adhesive on these strips can lose its effectiveness due to exposure to dust, moisture, or frequent repositioning, which can lead to the lights peeling off or drooping. The step-by-step guide provided offers practical solutions to rejuvenate the stickiness of the LED strips, ensuring they remain firmly in place. Among the recommendations, thoroughly cleaning the surface where the strips will be reapplied is crucial. This involves removing any residue or contaminants that could prevent the adhesive from bonding correctly. Using a suitable cleaning solution and ensuring the surface is completely dry sets the foundation for a stronger attachment.
Moreover, if the original adhesive is no longer viable, the guide suggests several alternatives to make the LED strips sticky again, such as applying double-sided tape or adhesive promoter, which are both effective methods for reinstallation. These options provide a strong bond and can be tailored to the specific needs of the environment where the LED strips are used. For example, in areas with high humidity or temperature fluctuations, choosing an adhesive with higher resistance to these factors is advisable. Additionally, for those seeking a more permanent solution, silicone adhesives or mounting clips can offer durability and a clean aesthetic without the residue often left by tapes. By following these steps, you can ensure that your LED light strips not only illuminate your space effectively but also stay in place reliably, enhancing both the functionality and the beauty of your lighting installation.